GitHub - firebase/flutterfire: 🔥 A collection of Firebase plugins for Flutter apps.
🔥 A collection of Firebase plugins for Flutter apps. - GitHub - firebase/flutterfire: 🔥 A collection of Firebase plugins for Flutter apps.
github.com
Notifications | FlutterFire
Notifications are an important tool used on the majority of applications, aimed at improve user experience & used to engage users
firebase.flutter.dev
FCM은 앱이 종료되어있을때나, 백그라운드에 있을때만 기본적으로 수신하며,
포그라운드에서 사용하고 있는경우에는 local notification을 이용해서 받아주어야합니다.
1. 설정
AOS 설정
android/src/main/AndroidManifest.xml
<manifest ... >
    <uses-permission android:name="android.permission.POST_NOTIFICATIONS"/>

	...

   <application
   		...
        <meta-data
           android:name="firebase_messaging_auto_init_enabled"
           android:value="false" />
        <meta-data
           android:name="firebase_analytics_collection_enabled"
           android:value="false" />
        ...
    </application>

</manifest>android/src//build.gradle
아래와 같이 로컬노티사용을 위해 디슈가링 의존성과 멀티덱스 항목을 추가한다.
...
android {

    ...

	defaultConfig {
        multiDexEnabled true // 추가
    }
    compileOptions {
        sourceCompatibility JavaVersion.VERSION_1_8
        targetCompatibility JavaVersion.VERSION_1_8
        coreLibraryDesugaringEnabled true // 추가
    }
    defaultConfig {
        multiDexEnabled = true // 추가
    }
}

dependencies {
    // local_notification 디슈가링 의존성 추가
    coreLibraryDesugaring 'com.android.tools:desugar_jdk_libs:1.1.5'
}
IOS 설정
ios\Runner\AppDelegate.swift
아래와 같이 추가
if #available(iOS 10.0, *) {
  UNUserNotificationCenter.current().delegate = self as? UNUserNotificationCenterDelegate
}
info.plist
아래와 같이 키값 추가
<dict>
    <key>FirebaseMessagingAutoInitEnabled</key>
    ...
</dict>
기본적인 세팅을 끝났다.
pubspec.yaml에 아래 라이브러리를 추가해주자
firebase_messaging: ^14.2.0
flutter_local_notifications: ^13.0.0
2. FCM 설정 코드

main.dart 에서 지금부터
firebase 초기화 후 필요한권한을 요청하고, 셋팅 해준다.
/// 메인 시작
Future<void> main() async {
  WidgetsFlutterBinding.ensureInitialized();

  /// firebase_options import 후 options 지정을 해줘야 init이 정상적으로 진행됨
  await Firebase.initializeApp(
    options: DefaultFirebaseOptions.currentPlatform,
  );

  // setting 함수
  await setupFlutterNotifications();

  /// main 실행
  runApp(const MyApp());
}
setupFlutterNotifications 는 아래와 같다.
// 필요 변수
late FlutterLocalNotificationsPlugin flutterLocalNotificationsPlugin;
late AndroidNotificationChannel channel;
bool isFlutterLocalNotificationsInitialized = false; // 셋팅여부 판단 flag

/// 셋팅 메소드
Future<void> setupFlutterNotifications() async {
  if (isFlutterLocalNotificationsInitialized) {
    return;
  }
  channel = const AndroidNotificationChannel(
    'high_importance_channel', // id
    'High Importance Notifications', // title
    description: 'This channel is used for important notifications.', // description
    importance: Importance.high,
  );
  flutterLocalNotificationsPlugin = FlutterLocalNotificationsPlugin();
  await flutterLocalNotificationsPlugin.resolvePlatformSpecificImplementation<AndroidFlutterLocalNotificationsPlugin>()?.createNotificationChannel(channel);
  // iOS foreground notification 권한
  await FirebaseMessaging.instance.setForegroundNotificationPresentationOptions(
    alert: true,
    badge: true,
    sound: true,
  );
  // IOS background 권한 체킹 , 요청
  await FirebaseMessaging.instance.requestPermission(
    alert: true,
    announcement: false,
    badge: true,
    carPlay: false,
    criticalAlert: false,
    provisional: false,
    sound: true,
  );
  // 토큰 요청
  getToken();
  // 셋팅flag 설정
  isFlutterLocalNotificationsInitialized = true;
}
Future<void> getToken() async {
  // ios
  String? token;
  if(defaultTargetPlatform == TargetPlatform.iOS ||defaultTargetPlatform == TargetPlatform.macOS) {
    token = await FirebaseMessaging.instance.getAPNSToken();
  }
  // aos
  else{
    token = await FirebaseMessaging.instance.getToken();
  }
  logger.i("fcmToken : $token");
}
MyApp()
메인앱 stful위젯에서 initState 부분에 수신감지후 처리해주도록 아래와 같이 작성한다.
class MyApp extends StatefulWidget {
  const MyApp({Key? key}) : super(key: key);

  @override
  State<MyApp> createState() => _MyAppState();
}

class _MyAppState extends State<MyApp> {
  @override
  void initState() {
    super.initState();
    // foreground 수신처리
    FirebaseMessaging.onMessage.listen(showFlutterNotification);
    // background 수신처리
    FirebaseMessaging.onBackgroundMessage(_firebaseMessagingBackgroundHandler);
  }
  @override
  Widget build(BuildContext context) {
    return MaterialApp(
        /// routes 설정
        initialRoute: '/',
        routes: {
          '/login': (context) => const ScreenLogin(),
          '/home': (context) => const Home(),
          '/notification': (context) => const ScreenNotification(),
        },
        home: const Home());
  }
}
전경, 배경 수신시에 처리해주는 함수는 아래와 같다.
/// fcm 배경 처리 (종료되어있거나, 백그라운드에 경우)
@pragma('vm:entry-point')
Future<void> _firebaseMessagingBackgroundHandler(RemoteMessage message) async {
  await Firebase.initializeApp(
    options: DefaultFirebaseOptions.currentPlatform,
  );
  await setupFlutterNotifications();  // 셋팅 메소드
  //showFlutterNotification(message);  // 로컬노티
}

/// fcm 전경 처리 - 로컬 알림 보이기
void showFlutterNotification(RemoteMessage message) {
  RemoteNotification? notification = message.notification;
  AndroidNotification? android = message.notification?.android;
  if (notification != null && android != null && !kIsWeb) { // 웹이 아니면서 안드로이드이고, 알림이 있는경우
    flutterLocalNotificationsPlugin.show(
      notification.hashCode,
      notification.title,
      notification.body,
      NotificationDetails(
        android: AndroidNotificationDetails(
          channel.id,
          channel.name,
          channelDescription: channel.description,
          // TODO add a proper drawable resource to android, for now using
          //      one that already exists in example app.
          icon: 'launch_background',
        ),
      ),
    );
  }
}
수신받은 알람 클릭을 통해
데이터를 처리해주거나 이벤트를 처리하거나, 화면을 이동하고싶다면
아래와 같이 구현하면 된다.
@override
void initState() {
  super.initState();
  // 알림 클릭시
  FirebaseMessaging.onMessageOpenedApp.listen(_handleMessage);
}
void _handleMessage(RemoteMessage message) {
  // 내가 지정한 그 알람이면? 지정한 화면으로 이동
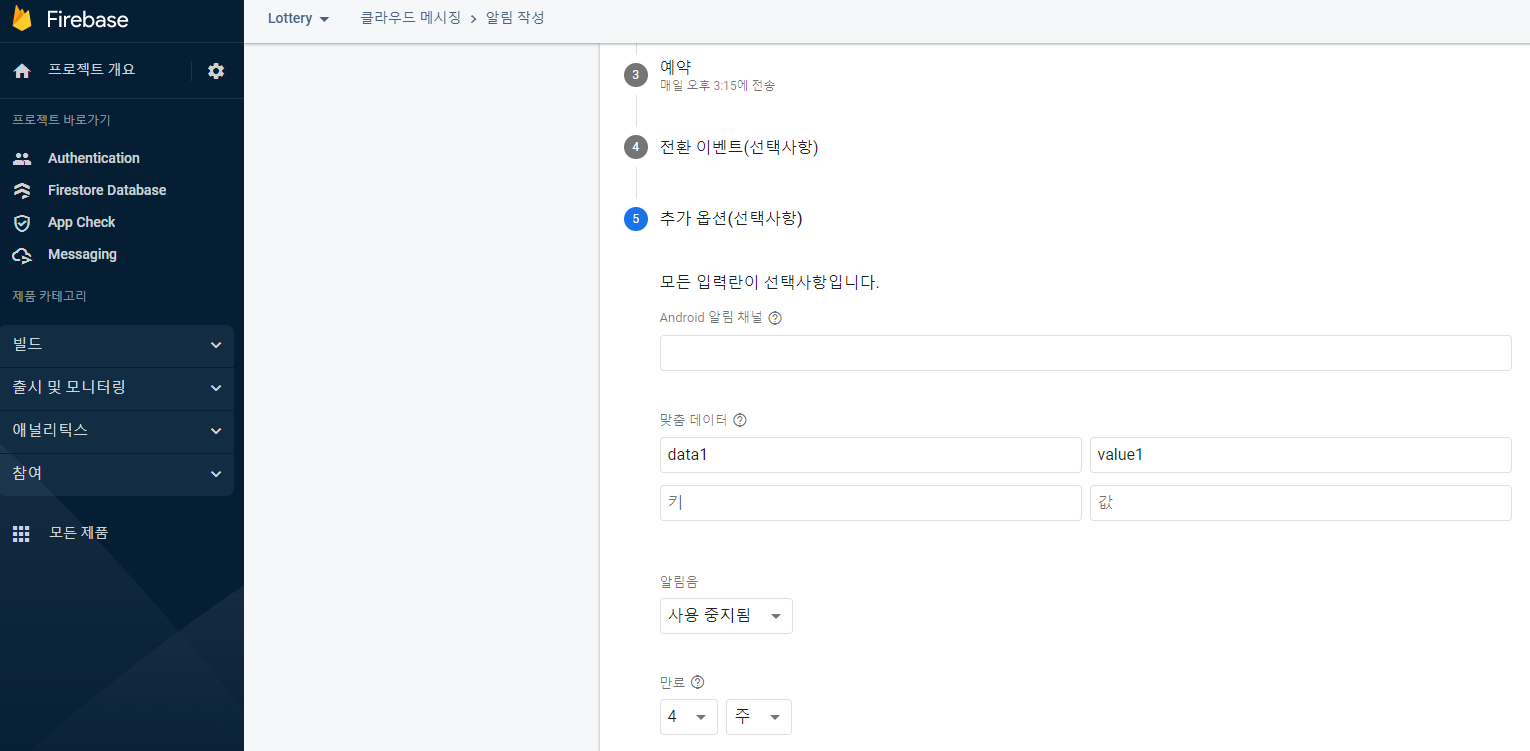
  if (message.data['data1'] == 'value1') {
    Navigator.pushNamed(context, '/notification'); // main에서는 이동불가 Home에 들어와서 해줘야함
  }
}
@override
설정 부분에서 셋팅해준 키 벨류값으로
알림을 구분해서 데이터를 처리할 예정이다.

이제 Foreground도 잘나온다.
화면이동이나 다른 이벤트처리도 가능하다!
공식 깃 예제를 참고하여 구현되었으며,
공식깃에서는 http를 이용한 FCM 호출도 추가적으로 나와있다.
다음번에는 로컬노티를 이용해 스케줄링을 해보자
'Study > Flutter' 카테고리의 다른 글
| [Flutter] flutter_secure_storage를 이용한 자동 로그인 (1) | 2023.01.18 |
|---|---|
| [Flutter] ensureInitialized() 언제, 왜 호출해야 하는가? (0) | 2023.01.18 |
| [Flutter] Firebase Cloud Messaging - FCM 테스트발송 (2) | 2022.12.23 |
| [Flutter] 빌드 오류, 컴파일 오류시 해결법 (0) | 2022.12.15 |
| [Flutter] JSON 직렬화, json_annotation을 통한 제너레이트 (0) | 2022.11.18 |


